February 25, 2008

Lemon Creme Brûlée with Fresh Berries


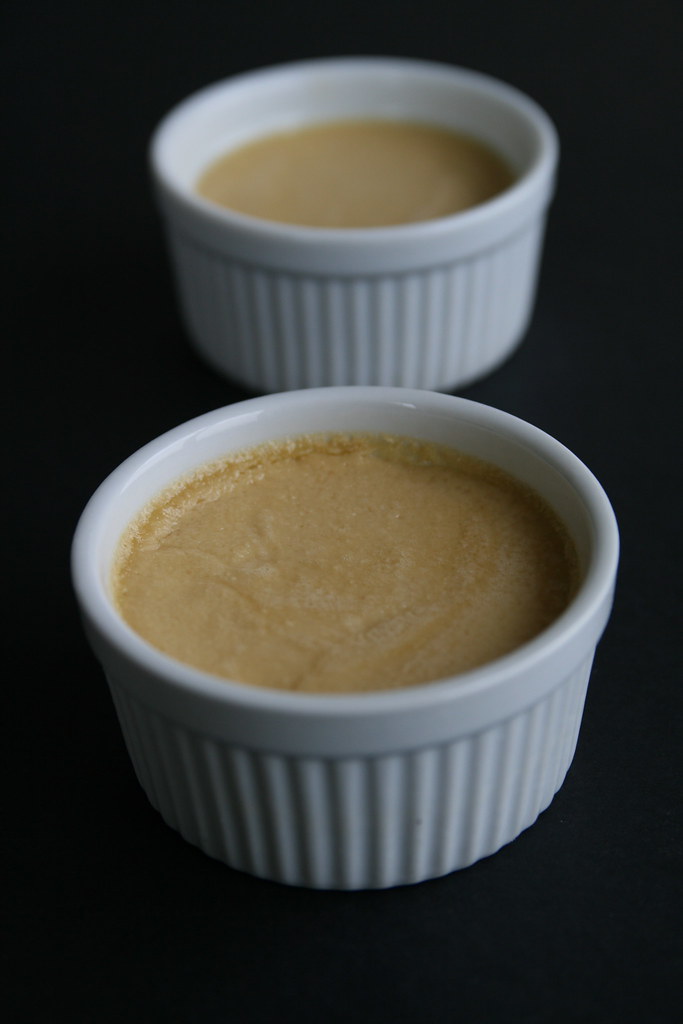
I was searching for a different Creme Brûlée recipe for a dessert potluck party when I found this one from Bon Appétit. I was immediately interested - lemon zest flavoring a creamy custard sounded so refreshing. And it had great reviews from many people.

I decided to scale the recipe for about five people - that way I could use up that pint of cream. The only mistake I made was using too little lemon zest. I zested the only 2 small organic lemons I had (about 1 1/2 teaspoons) - the zest of three or maybe even four small lemons would have been better. I know - that seems like a lot of lemon zest - and it will even smell like a lot when you are infusing the cream. But the recipe needs it - the reviewers were right. I'm going to try to get my hands on some lemon oil for the next time around - if it comes with recommendations from David Lebovitz, it must be worth it. I would also omit the vanilla completely. I find that the vanilla completely masks the delicate flavors of the lemon - and that's the point of the whole recipe.

This is my contribution to this month's Jihva for Ingredients, lemons & limes, hosted by Coffee over at The Spice Cafe.

Lemon Creme Brûlée
Servings: 5 to 6

For Custard
2 cups whipping cream
1/2 cup sugar
3-4 teaspoons grated lemon peel
1/8 teaspoon salt
5 large egg yolks

For Crème Brûlée
4 tablespoons sugar (regular white granulated sugar works best - I found brown sugar tends to burn before it caramelizes)
Fresh berries
1/8 cup (or less to taste) Chambord (black-raspberry liqueur) or crème de cassis (black-currant liqueur)

Preheat oven to 325°F. Arrange 5 or 6 ramekins in 13x9x2-inch metal baking pan. Combine cream and lemon peel in heavy small saucepan and bring to simmer. Whisk sugar and yolks in large bowl until thick, about 3 minutes. Gradually whisk in hot cream mixture, then add salt. Let stand 10 minutes. Strain custard, then divide among cups. Pour enough hot water into baking pan to come halfway up sides of cups.

Bake custards until just set in center, about 30-35 minutes. Remove custards from water bath; chill uncovered until firm, at least 3 hours. (Can be made 1 day ahead. Cover and keep refrigerated.)

Just before serving, top each ramekin with about a tablespoon of sugar dividing equally. Broil or torch until sugar melts and browns, about 2 minutes. Chill until topping is hard and crisp, at least 30 minutes and up to 2 hours.

Combine raspberries and liqueur in bowl. Let stand at room temperature at least 15 minutes and up to 1 hour. Spoon berry mixture atop custards.

Key points for making Creme Brûlée:

(For all the following, the reference is Harold Mcgee's epic 'On Food and Cooking')

  • The custards needs to cook in a narrow range from 175-185°F; exceeding this range by 5 or 10°F can cause the custards to become grainy. Cook the custards in a thin metal baking pan in a water bath. The water bath keeps the oven heat in check so the custards cook gently. (Water can't exceed 212F, and evaporative cooling keeps the water temperature lower at 180°F in a metal pan) A glass baking pan will retain more heat than a metal one (185°F)and reduces your margin of error somewhat.
  • Don't omit the salt - it's plays a key role in the custard formation.
  • This dessert is all about the texture, so it's necessary to strain the mixture before baking. Don't bother adding fresh berries or fruit into the custard - there will be pockets of liquid in the finished dish from the fruit. Pre-cooking and using some flour/cornstarch may help reduce that - but why spoil the texture?
  • Only cook the custards till the center jiggles slightly. They will finish cooking outside the oven.
  • A propane torch is invaluable for making the caramel topping. The caramel should be hard enough to shatter when rapped with a spoon. You should hear a satisfying crunch when it's cracked. If you don't hear that on your first trial ramekin, add more sugar, caramelize and refrigerate uncovered for a few minutes.
  • If using a broiler, chilled custards are particularly important so that the custards won't start cooking again. An ice bath would help too.
  • Scalding the cream is not strictly necessary - in this recipe its needed for the infusing the lemon peel. But it can be skipped if using lemon oil or other extracts. The custards will take a bit longer to set in the oven, but the recipe will work just fine otherwise.
  • Meeta provides more useful tips and tricks for making Creme Brulee, invaluable for first attempts.

February 17, 2008

Pots De Crème and other experiments...

Pots De Crème


After reading about how much Molly at Orangette liked a Pots De Crème recipe from an old issue of Gourmet magazine, I just had to give it a try. The recipe called for muscovado and demerara sugar - I couldn't find them at a couple of local supermarkets, so I went ahead and used brown sugar instead. Delicious. The custard seems similar to that for a Crème Brûlée. I tasted a bite after the ramekins had cooled to room temperature - and found I could not stop. These desserts can disappear in a jiffy. They are smooth and silky, and even though I had only used brown sugar, had some complexity in the sweetness. Since the recipe is so basic, just cream, eggs and sugar, every ingredient needs to shine. I can see why bothering to find quality ingredients and the specialty sugar can be worthwhile.

Green Mango Rice


I crave green mangoes every now and then. (Its also been years since I ate sweet luscious Alphonso mangoes, but lets not go there now). This stir fried Green Mango Rice is a keeper - coconut, green chillies, cilantro and mangoes play along nicely in this recipe. A different version of the classic sour rice preparations from South India, like lime rice and tamarind rice.

Appey Pancakes - Savory vegetable pancakes

I was looking for a quick and light meal - Appey made with rava and yogurt fit the bill. I added shredded carrots to my version for some extra nutrition. I didn't have the specialty pan to make these, so mine look more like savory vegetable pancakes. These would make a very nice breakfast, but I had these for dinner, and was left sort of still hungry - but that's still good for a diet dinner:)

Salt Baked Fish

I have seen versions of whole fish baked in salt in a number of places. So a whole red snapper got baked up in a dome of salt with a few crushed spices of my choice. Because the moisture is trapped inside the salt casing, the fish ends up juicy and tender. Easy to make - and definitely worth it. A word of caution though - this recipe has nothing but salt, the spices add very little to the dish - so its all about the fish, and not much else. I served this with some olive oil and lemon wedges.

February 7, 2008

Arbi Tandoori

My only introduction to Arbi (also known as Colocasia, Taro, Dasheen and Cocoyam) was in a Gujarati dish called Patra, where the elephant ear shaped leaves are smeared with chickpea paste and spices, then rolled and steamed to make a delicious side. It was only a few years ago that I discovered that the corm was used in Indian cooking as well. I had tasted a delicious version of chema pulusu, a tamarind based stew with Arbi, so I tried and tried to replicate it, with not much success to date. And the slimy texture of the cooked vegetable was a bit of a turn off.

Here a recipe with Arbi that I can finally say I like. The boiled arbi is coated with a yogurt and spice mixture and allowed to dry out in the oven - this coating makes the texture much less slimy, and the final stir fry with the onions and more spices brings the dish together nicely.

Arbi Tandoori
1/2 kg or 1.1lb Arbi
1 tbsp whole coriander seeds, lightly crushed
2 large onions cut into rings
1 tsp garam masala
1 1/2 tsp amchoor (dry mango) powder
4-5 green chillies, slit lengthwise
1/2" piece ginger, julienned
1 tbsp oil
Salt to taste

Marinade
1 cup thick yogurt - hung if necessary
1 tbsp tandoori masala
1 tsp ginger paste
1/2 tsp ajwain (carom seeds)
1 tbsp oil
1/2 tsp salt
1 tbsp besan (chickpea or gram flour)
Pinch turmeric
Fresh cracked pepper to taste

1. Boil arbi in salted water until tender. Peel and cut into 3/4" pieces and flatten slightly.
2. Mix all the marinade ingredients together.
3. Preheat oven to 180C or 360F. Grease a wire rack.
4. Coat the arbi pieces with the marinade and arrange on rack. Bake in the oven for 30 minutes. The yogurt mixture should dry up and from a coating on the arbi.
5. Heat oil. Add coriander seeds and wait until golden. Add onions and cook until light brown.
6. Add arbi, garam masala, amchoor, green chilies, ginger and salt. Stir fry for a few minutes. Serve hot with roti

February 5, 2008

Dry Fruit and Nut Balls


I have made these Dry Fruit and Nut balls countless times. They make a delicious snack. I find I can never stop after eating just one!

I used whatever dry fruit I had on hand instead - blueberries, cranberries and raisins. (It's a great way to use up those bags of dry fruit from Costco.) And since I was running low on pistachios, I used walnuts instead. No creme de cassis? Any orange liqueur works fine, or even just honey. It's fairly hard to mess this up. Just try to keep the ratio of sour to sweet dry fruit in balance. I shaped these by pressing the mixture into a tablespoon measure and sliding the ball out by pushing down on one end.

The original recipe is reproduced below. I don't have a meat grinder, so I chop the dry fruit as much as I can, and then pulse it in the food processor with the liquids until it is fairly small.

Give this a try - I think you will like it...

Dry Fruit and Nut Balls
5 ounces (approximately 1 cup) roasted pistachios
4 ounces (approximately 1 cup) dried cherries
2 ounces (approximately 1/2 cup) dried apricots
2 ounces (approximately 1/2 cup) golden raisins
2 ounces (approximately 1/2 cup) pitted dates
1 tablespoon orange juice
2 tablespoons creme de cassis

Put the pistachios in the bowl of a food processor and pulse until finely chopped, but not powdery. Divide in half into 2 separate bowls and set aside.

Put the cherries, apricots, raisins, and dates through a food grinder using the medium-grind blade. Add to the bowl with half of the pistachios. Add the orange juice and creme de cassis to the mixture and combine, using your hands, until the liquid is evenly distributed throughout. Shape the mixture into 24 walnut size balls and roll them in the remaining chopped pistachios. Store in an airtight container in the refrigerator for up to 1 week.

January 27, 2008

Boiled Peanuts


On the rare occasion that I find raw or green peanuts in their shells, I feel lucky. Boiled with salt, these make a deliciously addictive snack.

Peanuts are not really nuts, but legumes. They originated in South America in 2000 BCE. It wasn't until the 16th century that the Portuguese brought them to Africa, India and Asia! Isn't it almost ironic how something that only arrived a few hundred years ago has become so prominent and so integral a part of African and Asian cuisines?

In India, I have seen them being used in chutneys, spiced and roasted as a snack, or powdered and added to curries and gravies. From other cuisines, I have tried peanut soups, stews and dipping sauces. And of course, we shouldn't forget peanut butter and peanut brittle...

Peanuts are particularly susceptible to mold during storage, so check to see if your store had stored them in a cool dry place (the mold thrives in warm humid conditions).


Boiled peanuts
The recipe is simple. Cover the peanuts with water. Add plenty of salt. Taste for salt and add more as needed. The liquid should taste like sea water.

Pressure cook for 20-30 minutes or as needed. When done, the nuts should be fairly soft and the salt water should have oozed into the shells.

You can flavor small batches with additional seasonings too. I have tasted delicious Jalapeno flavored peanuts before, so this time, I made three batches: one with Habaneros, another with Red Chillies and Star Anise and the third was just plain salted peanuts.

Split the shells with your teeth so you can get the juices in your mouth. Now is not the time to be shelling them with your fingers!

This is my entry to Mansi's Game Night Party Event.

January 24, 2008

Apricot, Banana, Clementine Terrine


Terrine is French for a glazed earthenware cooking dish with vertical sides. It's also the name for any food that is prepared in a terrine (much like a tagine).


I was discussing terrines and this event with a friend, and she was aghast that I wouldn't try any other terrine. 'Jello with fruit?', she exclaimed. 'There are so many better things you can do', she said.My mind flashed back to the only time I had made and enjoyed this dish as a child, and I told her 'It tastes good...". Well? - she was right. I guess our palates change over time.

I made a Banana Bread pudding with a Tangerine Caramel sauce recently, and it had so many layers of flavors from caramelized bananas and from the fruity caramel. This dessert is at the exact opposite end of the spectrum. This is an incredibly simple tasting dessert, something that kids would love. Adults? I am not so sure... So why am I blogging about this? So people who are planning to make this, know what to expect I guess. This is my entry to The Passionate Cook's (Johanna) Waiter! There's something in my... event.


Apricot, Banana, Clementine Terrine

2 envelopes (1/4 ounce each) unflavored gelatin

2 cups white grape juice
1/2 cup sugar
5 1/2 to 6 cups of mixed fresh fruit, sliced. I used apricots, bananas, clementines and wild blueberries

In a small bowl, sprinkle gelatin over 1/4 cup grape juice; let soften 2 to 3 minutes.

Heat sugar with another 1/4 cup grape juice in a small saucepan over medium-high heat until dissolved. Remove from heat; stir in softened gelatin until dissolved, then stir in remaining 1 1/2 cups grape juice.

Place fruit in a 4-by-8-inch (6 cup capacity) loaf pan; pour gelatin mixture over, pressing fruit gently to submerge completely. Refrigerate until firm, at least 3 hours.

To unmold, dip bottom of pan in hot water for a few seconds. Invert onto a serving platter, and shake firmly to relase. Slice to serve.

References
This recipe is adapted from Elise's Berry and Banana Terrine.


January 18, 2008

Dahi Chaat - A Savory Yogurt Snack


Chaat - I suspect just the mere mention of this word gets people from India salivating. Chaat is the generic word for a range of Indian snacks, typically served by street vendors. Literally translated it means 'to lick' - these little plates of food are so lip smackingly delicious - you can't resist licking the plate clean.


There are a whole bunch of different dishes that fall under the chaat category: Dahi Puri, Pani Puri, Bhel Puri, etc. Puri - in this case, means a bite sized piece of crispy fried bread, the hollow shell of which is filled or topped with a number of different ingredients. You can find more information on chaat here.

In my version of dahi or yogurt chaat, I use store bought Armenian Cracker Bread in place of the puris. This crisp cracker bread is made with whole grain and it's baked, not fried. I load up this bread with chutneys, yogurt, spices and boiled potatoes and legumes . With all the delicious stuff on the bread, it becomes merely a crisp receptacle for the toppings. Healthy, fun, protein packed and a meal by itself, this dish is great for when I am not in the mood to cook anything elaborate. (I try to keep a mixture of boiled moong, chickpeas and potatoes in my freezer just for adding to chat.) This makes for a fun weeknight dinner.


The only specialty ingredient is the black salt*. This red or purple colored salt is mined from the earth, and has a distinct flavor that regular salt just can't provide. If you can taste the cracker bread, there aren't enough toppings on it - add more yogurt, chilli/cumin/black salt powder and taste again. It may take a couple of attempts to get the quantities right.

Dahi Chaat
(Serves about 4)

1 package Armenian Cracker bread
mint-coriander chutney, store bought or homemade (I like the Swad brand)
canned chickpeas (garbanzo beans)
moong, boiled
potatoes, boiled and cubed
cumin powder
black salt, powdered
red chilli powder
1 onion, chopped
a small bunch of cilantro, chopped
yogurt
thin sev (optional)

Tamarind chutney
Dilute the tamarind concentrate in some water. Add brown sugar, salt, ginger powder and chilli powder to taste. It should taste sweet and sour.


1. Whisk the yogurt with some water if needed until smooth. The consistency shouldn't be too thick or too watery. Season with a little salt.
2. Season the moong, potatoes and chickpeas with salt and chilli powder
3. Spread a generous helping of the mint chutney on the bread. Top with potatoes, moong, chickpeas, onions and cilantro.
4. Drizzle yogurt and tamarind chutney on top. Sprinkle cumin, chilli powder and black salt.
5. The final topping is sev, if using, for some added crunch.

Serve right away before the bread gets soggy.

*Black salt is called kala namak or sanchal in Hindi. It is an unrefined mixture of minerals with a sulfurous smell. This is not the same as Hawaiian black sea salt, which is made by mixing sea salt with activated charcoal. No other salt is a good substitute for black salt's taste, so it is worth the trouble of getting the real thing. It is available online or in Indian grocery stores.